Friday 22 April 2016

Blogger Tutorials for Beginners - 2016 Edition (With Screenshots)

Leave a Comment
A Beginner's Guide to Blogger / Blogspot (with Screenshots) - 2016

I never make resolutions in my Life, For the Last 15 odd years I never made any resolution because I knew that I won't follow them or implement them.

But now we are in 2016, and I have made a resolution which I am actually implementing with this Blog........You Got it Right !!!....Blogging - As a Passion as well considering it be an Opportunity to Make Money Online.

I had made a Resolution that I would do Blogging and make a Youtube Channel of my Own. So here I am to help you out with everything from the Basics of Blogging to actually making Money from Blogging, which is one form of "Making Money Online".

Before we go Ahead you make a decision for yourself whether you want to go with "Blogger / Blogspot" or Wordpress. 

Note: You Need to look For the Comparison between Wordpress.com and Wordpress.org if at all you have to go with Wordpress

 I am Going to give you an Explanation for Blogger Platform, (I didn't opt for Wordpress.com because you cannot have ads on Wordpress.com)
For Beginners I will just tell you the Difference between Wordpress.com and Wordpress.org and that is 
 "Wordpress.com is free" and "Wordpress.org" is paid !!!
 If at all I had to go with Wordpress.com - the Free Platform it has got One Disadvantage and that is.............
    You Cannot have Ads on Wordpress.com (Biggest Drawback)
(This is the Biggest Drawback of Wordpress.com) so I decided that I will go ahead with Blogger.com / Blogspot.com
  • So I will Guide you through each and every single step with the help of Screenshots.
First of all Make Sure you have a Valid Gmail Account because this is the first step needed to start blogging, if you don't have one sign up for Gmail. 

If you don't know How to create a Gmail account follow the Steps given on this page "How to Create a Gmail Account"

If you already have a Gmail Account proceed with the Following Steps.
1. Go to google.com


2. Now Enter blogger in the search box or enter blogger.com in the Address Bar


3. The Following Screen will Appear (Blogger Sign in Page)

4. After you Sign in with Blogger, you will get the following screen
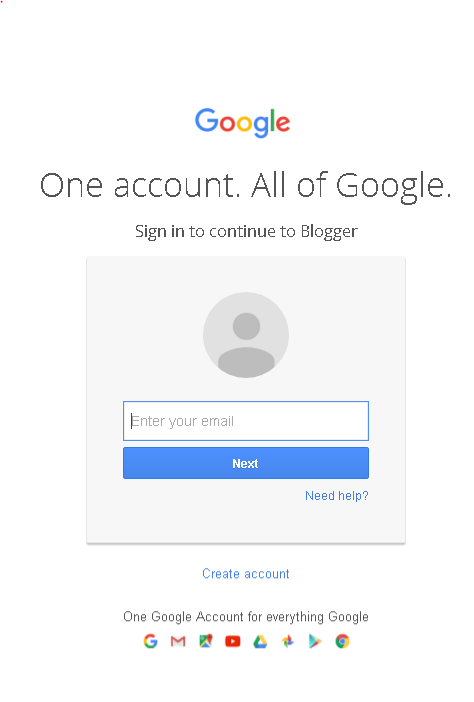
Blogger sign in page
Sign in Page for Blogger


Now to create a New Blog Click on “New Blog” Button shown as Highlighted in the Screenshot below


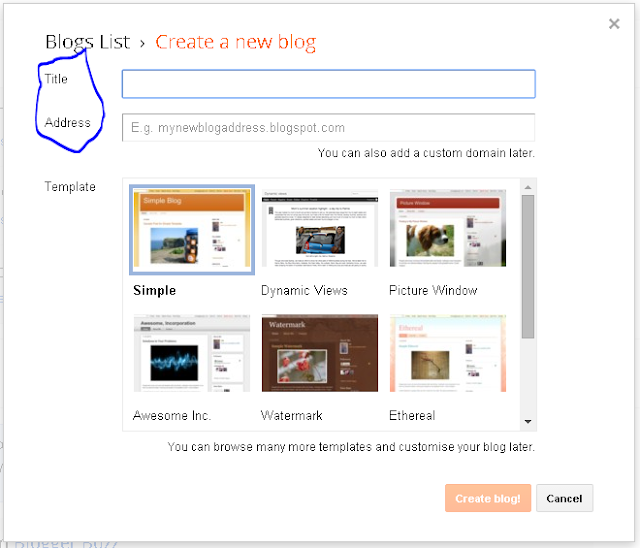
Create a new blog


You will be redirected to the following screen


Now enter a suitable title for your blog and your address 


After you are done Entering the Blog Title and URL, then Click on "Create Blog!" 

You will get a Screen as shown below


Now You are Done with the First Step of Creation of a Blog


Chapter 2: How to Create a New Post in Blogger/Blogspot.com (with Screenshots)


Read More...

Thursday 14 April 2016

Step by Step Guide to Create and Verify a Paypal Account - 2016 (With Screenshots)

Leave a Comment
What’s so Special about this Article. I have covered each and every step about Getting Started with Paypal (with Screenshots) Especially for Indian Paypal Users.

A Beginner’s Guide to Paypal for Indian Users. Follow Each and every step as it is to Successfully create a Paypal Account

1. First of Enter Paypal in Google Search Box

Then a Sign up Page will Appear as shown in the Screenshot below 

Note : The Sign up Page might be different in your case as it keeps changing. What is Important is that you Click on Sign Up Button


Sign up page
Sign Up Page for Paypal
After you Click on Sign up Button the Following Page will Appear as shown in the Screenshot below


Individual or Business

Select Whether Individual or Business Account
Now in this Step Click on the type of Account that you want whether you want an Individual or a Business Account.


How to Create a Paypal Account

what is paypal account and how to open it
How to Use Paypal to Receive Money


Now that all the Transactions are dealt in USD (in simple terms Dollars), whether you are a blogger or any freelancer, you will certainly have to deal in Dollars or any other foreign Currency . In such cases you will come across Services like Paypal, Payoneer etc. and it is mandatory that you should make yourself conversant with Paypal and Payoneer although there are options for Linking your Bank Accounts.

Let me give a small introduction about myself, I am a Blogger who is a Beginner to mid-level Indian Blogger. Just like you when I started blogging and thought of Making Money Online I heard about Paypal and Payoneer, but initially I had absolutely no Idea what Paypal was; all I knew was that Paypal was used for Indian to Foreign exchange or for Dealing in Dollars and Euros (that’s all) then I went on collecting Information about Paypal for Indian Users and then I thought that I should make a Definitive Guide regarding Paypal for Indian Bloggers, Freelancers and all the Individuals who wanted to get started with Paypal.

how to sign up for paypal in india 

How to Create a PayPal Account 


How to Set Up Your PayPal Account Step by Step

How to Select the Purpose Code for Paypal Transactions
Linking your Bank Details to your Paypal Account
Two Small amounts will be added to your bank account to be precise (My small amounts were 1.11 and 1.06), I just can’t tell you how happy I was after receving that Rs.2.17 Into bank account, (even you will understand the importance of this when you will be eagerly waiting for these two small transactions) !!!

Adding/Linking a Debit/Credit Card to your Paypal Account
Read More...

Saturday 2 April 2016

What is Incognito Mode - How and Why to Use it (with Screenshots)

Leave a Comment
If you are Tired of Clearing your Browsing History or Don’t want your Browsing History to be recorded, then you should start using Incognito Mode (Private Browsing).


Symbol for Incognito Mode

Before we proceed, let me Explain Why we may need to use Incognito Mode:

1. You Don’t want your Browsing History to be Stored in the Browser History.

2. You don’t want the Other person to know about

- what you were browsing or the Websites that you have visited,

- or you didn’t have the Time to clear the Browsing History by the Time the Other Person arrived. (I know what’s going on in your mind but that is not the only Reason why we should use Incognito Mode).

3. Everybody has his or Her reason for using Incognito mode. Whatever may be the reason I will Explain How Incognito Mode Works.

Incognito Browsing also known as private browsing doesn’t store your browsing history. If you don’t want your Browser (Chrome or Mozilla) to save a record of what you have browsed, then remember a shortcut which comes handy everytime for me, and that shortcut is “Ctrl + Shift + N” if you are Using a Windows or Ubuntu OS, and if you are using a Macintosh (Mac) then the Shortcut is ⌘ + Shift + N to open an incognito window.


How to Browse using Incognito Mode in Google Chrome.


If you are a Google Chrome user follow the Given Instructions.

1. Double Click on Google Chrome Icon. Now the Window that will open is the Default Chrome Window


2. Go to the Extreme Right hand Corner (Top Right hand Corner) and 
Chrome menu
 for (computer) or  for (mobile).

Click on the Extreme Right corner button


3. Click on New Incognito Window (Alternative Shortcut is “Ctrl + Shift + N”). Now you are Ready to Start Private Browsing or Incognito Mode in Google Chrome


This is the Incognito Browsing Window
This is the Message you get for Incognito Browsing


Special Note: You might think that you are browsing privately, but that doesn’t mean that your employer cannot track you, your Employer still has a detailed history of What you are browsing.


********************************************************************************************************

How to Browse using Incognito Mode in Mozilla Firefox

1. Double Click on Mozilla Firefox Icon. Now the Window that will open is the Default Mozilla Firefox Window

2. Go to the Extreme Right hand Corner (Top Right hand Corner) and Click on the  icon as shown in the screenshot below.


Incognito Mode for Mozilla

Incognito Mode in Mozilla Firefox

Incognito message in mozilla

You are Privately Browsing
3. Click on New Private Window (Alternative Shortcut is “Ctrl + Shift + P”). Now you are Ready to Start Private Browsing or Incognito Mode in Mozilla Firefox

********************************************************************************************************

How to Enable Incognito Mode in Mobile

If you are Using an Android or iOS mobile (iPhones) then follow the Instructions given Below.

Click on icon present in your mobile. This is as shown in the screenshot below

incognito Mode for mobile

Incognito Mode for mobile

Now I have Told you about Incognito Mode Browsing in Google Chrome, Mozilla Firefox, and Mobile.

If you Liked This Article, Kindly Share this with your Friends using the Share Buttons present on the Left hand side of this Window


Read More...

Friday 1 April 2016

What is Viglink and How to Earn Money Using Viglink (with ScreenShots)

Leave a Comment
A Beginner's Guide to Get Started with Viglink

Viglink: Have you Heard this term Before, if not, fret not I will take you through the Entire Tutorial to get Started with Viglink.

First of all let me tell you What is Viglink???

To get Started with Viglink and Earn Money Click Here


This file is licensed under the 
Creative Commons Attribution-Share Alike 3.0 Unported license.
or Click on this Link: 
viglink.com/?vgref=1867161

viglink.com/?vgref=1867161
Read More...

Samsung Galaxy S7 Reviews, Price, Specifications and Our Verdict

Leave a Comment


Here we Bring to you a Complete Review of Samsung Galaxy S7 along with its Specifications, Price, performance and the First mobile with a 4 GB RAM.

Samsung Galaxy s7 reviews 


PROS:

    Improved battery
    Stronger camera
    Always on display looks great

CONS:

    Design very similar
    No Adoptable Storage for MicroSD
    No USB Type-C
5.1-inch, quad-HD display
3,000mAh battery
12MP camera
Fast and wireless charging
MicroSD
Android 6.0.1 Marshmallow
4GB RAM
5MP selfie camera
Exynos 8890 processor
Manufacturer: Samsung

Samsung Galaxy S7 review

I don't know why phone manufacturers back themselves into a corner like this - giving the public a reason to criticise their new device when it actually does pack some decent upgrades.

If you look beyond the design similarities, Samsung's fixed nearly everything that was disappointing about the S6. The dropped waterproofing is back once again, with IP68 rating. The battery has boosted from 2550mAh to 3000mAh with little change in the dimensions. The microSD expandable memory is back in force.

Samsung Galaxy S7 launch date in india

 Galaxy S7 is priced at Rs 48,900 in the Indian market.

Display : 5.1 inch 1440 x 2560 AMOLED  at 577ppi,

Processor : Octa-core Samsung Exynos 8890 processor (Four 2.6GHz cores and four 1.59GHz cores)


Hands on Experience of Samsung Galaxy S7


It's now waterproof 

it validates what Sony's been doing for years.

It's the same QHD resolution that we're seeing on multiple smartphones these days

The 5.1-inch screen is back once again

The fingerprint scanner is present.

S6 had a brilliant biometric option

The addition of Android Marshmallow


Sadly there's no USB-C connector on the bottom - well, sadly for the tech fan who would have liked to easily plug in their charger either way up and enjoyed the faster speeds on offer. 

Android 6.0 Marshmallow, 4GB RAM, 32GB built-in storage expandable up to 200GB via microSD, 12MP rear camera with LED flash and OIS, 5MP front camera, 3,000mAh battery, 142x70x7.9mm, 152g.
Price From £569


samsung galaxy s7 accessories, samsung galaxy s7 launch date
Read More...

Earn Money using Viglink